Posts

Showing posts from August, 2013

Step By Step - Easy Guide On LSMW (For Beginners) With Example - Page 10.

Image
>> PREVIOUS PAGE STEP 14: Create Batch Input Session Once the source data is converted in an internal format, you can create a batch session to process the necessary updates. Simply execute it to create a batch input folder. You will get a info message as shown below. STEP 15: Run batch Input Session You can execute the BDC session by Run Batch input session. Executing a batch input session is a standard SM35 transaction for managing BDC sessions. Select the session and click on Process. You will get a pop up and choose the processing mode. Here we select Display errors only as the processing mode. Once you click on process Once you have successfully executed the batch input session, the Customer Master records are updated in the system. You can confirm this by viewing the Customer Master records (XD03). >> PREVIOUS PAGE Step By Step Explained in Detail.  (Import Method - Batch Input Recording) STEP 1: Create Project / Su...
Step By Step - Easy Guide On LSMW (For Beginners) With Example - Page 9.

Image
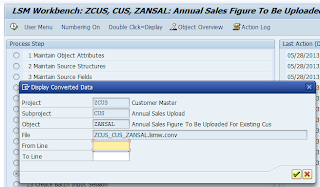
>> PREVIOUS PAGE                                                                                     >> NEXT PAGE STEP 13: Display Converted Data In the step ‘Display Converted Data’, you can display the converted data, choosing to show all converted data or an interval as shown above. The data are shown as the target structures, in case more target structures are being used in one transaction, the hierarchy of the transaction is displayed by the use of a different color legend. By clicking on one of the lines, you proceed to the field level of the line, where you can check the converted data as shown below. After the step ‘Display Converted Data’ the exact content of the next steps may differ, depending on the import technique that yo...

Step By Step - Easy Guide On LSMW (For Beginners) With Example - Page 8.

Image
>> PREVIOUS PAGE                                                                                   >> NEXT PAGE STEP 11: Display Read Data In the step ‘Display Read Data’, you can display the read data (data was read in the previous step), choosing to show all read data or an interval as shown above. You can select how many rows you want it to display, or you can simply continue to display all the read content. STEP 12: Convert Data In the step ‘Convert Data’, works like the step ‘Read Data’, but uses the conversion program instead of the read program. You can define a range of transactions to be converted, at the end of this range the conversion program stops running. Note: It is recommended that when you load big amount of data in production,...

Step By Step - Easy Guide On LSMW (For Beginners) With Example - Page 7.

Image
>> PREVIOUS PAGE                                                                                     >> NEXT PAGE STEP 9: Assign Files:  In the step ‘Assign Files’, you can assign the file name in step 8 declared as source file to the target structure defined in step 2. In this case, since there are no header and line items files, the system automatically defaults the filename to the source structure. STEP 10: Read Data In this step, LSMW reads the data from the source file (In our case from the PC's local drive). Here we have the option to read only selected rows and convert data values to internal format. Simply execute the above screen. After the execution, you will be able to see a similar screen as shown below. >> PREVI...

Step By Step - Easy Guide On LSMW (For Beginners) With Example - Page 6.

Image
>> PREVIOUS PAGE                                                                                     >> NEXT PAGE Step 7: Maintain Fixed Values, Translations, User Defined Routines. In the step ‘Maintain Fixed Values, Translations, User-Defined Routines’, you can process the reusable rules of a project, which are defined at project level, so they are the same for all objects. Fixed value: Here you can specify the length, type flag for lowercase/uppercase and value in addition to the name of the field. Translation: Here you can enter information on the source field and the target field. If you are creating a new translation you have to save data first before you can change it. User Defined Routines: This routine can be re-used in other objects of the...

Step By Step - Easy Guide On LSMW (For Beginners) With Example - Page 5.

Image
>> PREVIOUS PAGE                                                                                     >> NEXT PAGE STEP 5: Maintain Structure Relations In the step ‘Maintain Structure Relations’, the structural relationships between source and target structures are defined. The possible target structures are defined during the selection of the object type and the import technique. To define structural relationships, position the cursor on the field target structures. On clicking 'Create Relationship' button opens a window that displays the existing source structures for selection. If you want to change the relation, remove the existing relation first. In addition, you can use Check to check the structural relationships for errors. In this case, since w...

Step By Step - Easy Guide On LSMW (For Beginners) With Example - Page 4.

Image
>> PREVIOUS PAGE                                                                                     >> NEXT PAGE STEP 3: Maintain Source Structures In the step ‘Maintain Source Structures’ you define the structures of the object with name, description and the hierarchical relationships: Click on Change button. You can now define, change, reassign or delete structures. All these functions are available via pushbuttons. When you define more than one structure, a popup is displayed querying the relations between the structures: equal/subordinate? Note: For migration objects created via transaction recording, you may only define one structure per recording, since only one flat target structure per recording is available. STEP 4: Maintain Source Fiel...

Step By Step - Easy Guide On LSMW (For Beginners) With Example - Page 3.

Image
>> PREVIOUS PAGE                                                                                     >> NEXT PAGE After entering the annual sales figure click On Save. You will see a new screen as shown below: Double Click On Fields which you want to map as shown below: Now keep on saving screen (and return back) until you reach the initial screen as shown below. >> PREVIOUS PAGE                                                                                      >> NEXT PAGE Step ...

Step By Step - Easy Guide On LSMW (For Beginners) With Example - Page 2.

Image
<< PREVIOUS PAGE                                                                                     >> NEXT PAGE Here we have taken recording name as XD02_ANSAL. Now Click On . You will be redirected to a new screen. Click On Create Button as shown. Now the recording gets started. All we have to do is enter the customer number, Select the check box marketing and then enter the annual sales figure and then save. Press Enter. << PREVIOUS PAGE                                                                                     ...

Step By Step - Easy Guide On LSMW (For Beginners) With Example - Page 1.

Image
The LSM Workbench is a tool that supports data transfer from non-SAP systems to R/3. The main functions of the LSM Workbench are: -- Import data (legacy data in spreadsheet tables and /or sequential files) -- Convert data (from source format to target format) -- Import data (into the database of the R/3 application) Here we are trying to update Annual Sales Figure of Existing Customer Master records. STEP 1: Create Project / Sub-Project / Object This is the end of step 1. In step 1 all we do is: Create a new project (or use existing ones), Subproject and an object for our development. Click On Execute or simply press ENTER button. STEP 2: Maintain Object Attributes: Select Maintain Object Attributes and Execute. Select Maintain Object Attributes option and Execute as shown below. Here we are updating customer master records (i.e. annual sales figures). We select the batch Input recording as the import method.     ...