Step By Step - Easy Guide On LSMW (For Beginners) With Example - Page 9.
>> PREVIOUS PAGE >> NEXT PAGE
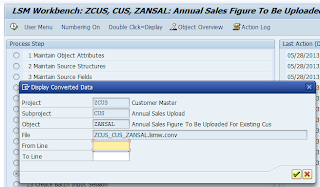
STEP 13: Display Converted Data
In the step ‘Display Converted Data’, you can display the converted data, choosing to show all converted data or an interval as shown above.
The data are shown as the target structures, in case more target structures are being used in one transaction, the hierarchy of the transaction is displayed by the use of a different color legend.
By clicking on one of the lines, you proceed to the field level of the line, where you can check the converted data as shown below.
After the step ‘Display Converted Data’ the exact content of the next steps may differ, depending on the import technique that you have chosen in step 1. The steps displayed by the program for the different import techniques are:
Standard batch input or recording:
- Generate batch input session
- Run batch input session
Standard direct input:
- Start direct input session
BAPI or IDoc:
- Start IDoc creation
- Start IDoc processing
- Create IDoc overview
- Start IDoc post-processing
>> PREVIOUS PAGE >> NEXT PAGE
Step By Step Explained in Detail.
(Import Method - Batch Input Recording)
(Import Method - Batch Input Recording)
STEP 1: Create Project / Sub-Project / Object
STEP 2: Maintain Object Attributes: Select Maintain Object Attributes and Execute
STEP 3: Maintain Source Structures
STEP 4: Maintain Source Fields
STEP 5: Maintain Structure Relations
STEP 6: Maintain Field Mapping and Conversion Rules
STEP 7: Maintain Fixed Values, Translations, User Defined Routines
STEP 8: Specify Files
STEP 9: Assign Files
STEP 10: Read Data
STEP 11: Display Read Data
STEP 12: Convert Data
STEP 13: Display Converted Data
STEP 14: Create Batch Input Session


